Re-pivoting without special toolsby Gavin Leach, UK
Download a pdf of this article
A lot has been written about the technicalities and problems of renewing damaged pivots on clock arbors—to the point that the average new starter to horology tends to avoid the subject entirely!
With little more than a small lathe, re-pivoting is not just possible it is actually quite easy. No expensive professional tools are required, just a suitably sized (the diameter of the new pivot) jobber drill and a short length of scrap brass bar. And blue pivot steel is not required!
Jobber drills are the ones readily available from most suppliers, even diy stores. They are black over their full length and hardened from tip to toe. Pivot-sized drills, in tubes of 10, cost less than 30p each. The brass bar is best if it has a square section of about 6mm to 10mm, and about 50 to 100mm long (the size of a lathe cutting tool).
First you must make the repivoting tool.
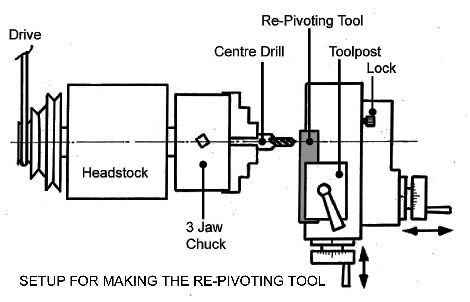
Secure a small centre drill into the three-jaw headstock chuck. Remove any cutting tool from the tool post and insert the brass bar (this will become the re-pivoting tool) packed up from underneath till it is as high as it will go and tighten. Square up the tool post so the bar is at 90 degrees to the machine bed and tighten. Wind the cross feed till the end of the brass bar is about 5mm past machine centre, then lock the cross slide tightly.
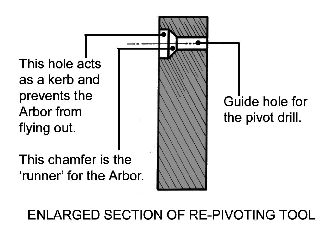
Start the lathe and wind the apron feed until the drill ‘pops’ the bar. (If all is as expected the mark will be on, or about, the centre line of the bar and 5mm from its end.) Remove the centre drill from the chuck; replace this with the pivot sized jobber drill and drill right through the brass bar.Remove the jobber drill and replace this with another drill that is just larger than the arbor diameter, next to the damaged pivot, then drill about 25 per cent into the bar. The chamfered base of this hole acts as a ‘runner’ on which the arbor is located during re-pivoting.
You have now made a re-pivoting tool. It has to be said that it is just for this one job, with these particular arbor and pivot sizes. Leave the tool set up as it is, do not remove it from the lathe and do not slacken the cross slide.
Now prepare the damaged arbor.
We want the arbor ‘end’ soft enough to drill, but without losing the temper from the pinion (or damage any brass wheel that might be mounted close by). To achieve this, the whole of the arbor, except the end with the damaged pivot, is wrapped with wet toilet tissue. In addition a tight fitting ‘penny’ washer (to act as a heat sink) is slid down the shaft to touch the wet paper leaving just the end of the arbor exposed.
A gas blowlamp is used to quickly bring the old pivot area up to cherry red and it is kept like this for about a minute. The lamp is then moved to under the arbor and slowly drawn away, so that it cools from red heat - but ‘slowly’. The arbor end is now softened. (If in this process the brass wheel could not be protected, it should be removed before any heat was applied.)
The old pivot (if not already broken off) is nipped off at the shoulder, which is then stoned till it is both flat and at a true 90 degrees to the arbor. The sharp edge of the shoulder is then stoned to a fine chamfer, to match the cutting angle of the drill used to make the ‘runner’ in the re-pivoting tool.
The damaged arbor is now ready for mounting in the lathe.
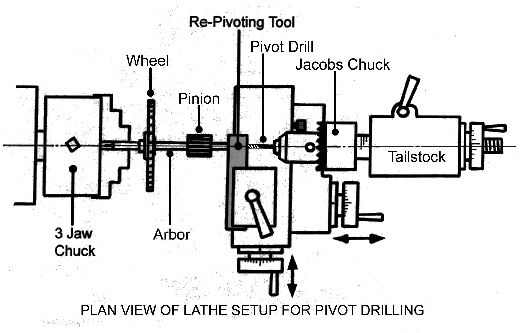
Loosely secure the arbor into the three-jaw headstock chuck: do not over-tighten. Wind the lathe’s apron feed left until the softened arbor end is located within the large hole of the brass re-pivoting tool.
Ensure that the arbor is straight and level, then fully tighten the three-jaw chuck. Lubricate the arbor end where it is to run in the re-pivot tool and add just a little more feed to the apron till the re-pivot tool is up to the arbor and the chamfers are in ‘hard’ contact. Now fully lock down the apron feed clamp screw.
Note: If your lathe is not fitted with cross or apron feed locking screws, try wrapping the hand wheels to the casting bosses with insulating tape.


We are ready for drilling the arbor to receive the replacement pivot. The hole should be as deep as possible (say three to five times the pivot diameter) remembering that only a short distance has been softened.
Mount the pivot-sized jobber drill in the tailstock Jacob chuck and lock the tailstock so the drill tip is just out of the re-pivoting tool.
Lubricate the drill tip and the hole in the re-pivoting tool. Start the lathe at high speed, then slowly wind in the jobber drill, first into its support hole in the tool and then till it just starts to bite the end of the arbor. Stop, wind out, clean, apply more oil.
Repeat this operation several times until either the correct depth of hole is achieved or the drill starts to ‘scream’, without cutting.
Note: If the drill does scream and stops cutting, it is pointless trying to continue. Go right back to the start and re-soften the end of the arbor.
Now make and fit the replacement pivot.
A part of the plain end of the jobber drill is what we are to use to make the pivot. These drills are hardened over their full length, the plain end being harder than ‘blue pivot steel’ and hence ideal for pivoting.
Remove the clock arbor and the drill from the lathe; wash away all traces of swarf and lubricating oil from both items. Fully enter the end of the plain shank of the jobber drill into the newly made hole in the arbor. Pass a pin vice over the exposed flutes of the drill. Slide this down until the length of pivot required is all that is left to be seen between the end of the arbor and the jaws of the pin vice. Secure this pin vice.
Remove the drill (from the arbor) and secure a second pin vice on to the exposed drill shank, so this touches the first vice with no clearance gap. Both pin vices should then be retightened to their maximum. In one deliberate swift action, while holding one pin vice in each hand, snap the drill. One vice will contain the main cutting part of the drill, (which can be re-used) the other vice will be holding the new replacement pivot.
Remove the pivot and, using a stone or lap, clean up the edges of the break. It is only the diameter of the break that should be cleaned - it does not matter about the end face.
Fitting the replacement pivot:
With this method the replacement pivot will not be a ‘tight’ fit to the hole in the arbor (hence our attempts to get the hole as deep as possible to ensure the stub is supported truly ‘in line’). But securing the stub is easy.
Re-clean the pivot stub and the hole in the arbor with methylated spirit. Tightly secure the pivot in a pin vice, with the break end showing. Have just more of the pivot out of the vice than the depth of the hole in the arbor. (The pivot and vice must be ‘in line’ otherwise the completed pivot replacement will not be true.)
With the arbor vertical and the hole uppermost, using fine pegwood insert one drop of Superglue to the base of the hole. Be careful not to get glue on the sides of the hole.
With the arbor still vertical and the pin vice also vertical, insert the pivot in the hole, ensuring that all is in line. Push hard home and keep pushing for at least one minute. (The Superglue will have been forced up the joint, securing the pivot stub.)
Gently lay the arbor/vice assembly down flat and leave for one hour for the Superglue to cure then emove the pin vice and, using a sharp knife, cut away any excess glue.
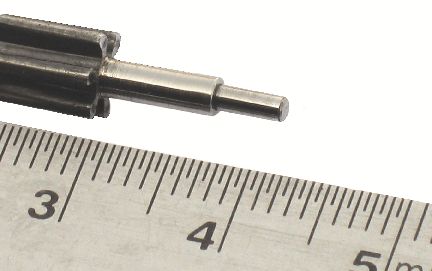
The repaired arbor is now ready for the new pivot to be burnished and the clock plate re-bushed to suit. (Two complete subjects in their own right.)
If the jobber drill cost 30 pence and it was possible to break three pivot lengths from its shank the price of this pivot repair was just 10p!
Download a pdf of this article
|
|

